| View previous topic :: View next topic |
| Author |
Message |
Ruptured Duck
Joined: 28 Dec 2009
Posts: 59
Location: Gainseville Ga
|
 Posted: Fri Mar 12, 2010 11:54 am Post subject: Code Name = "Fat Chick" A father & son project Posted: Fri Mar 12, 2010 11:54 am Post subject: Code Name = "Fat Chick" A father & son project |
 |
|
Thought I would move my thread over here... Started as a knocking motor question and has kind of gone in a new direction.
Here is the original post link for Athens VW Club and also where I was posting on a Off-Road forum...
http://www.athensvwclub.com/phpBB2/viewtopic.php?t=910
http://offcamber4wd.org/forum/index.php?topic=6710.0
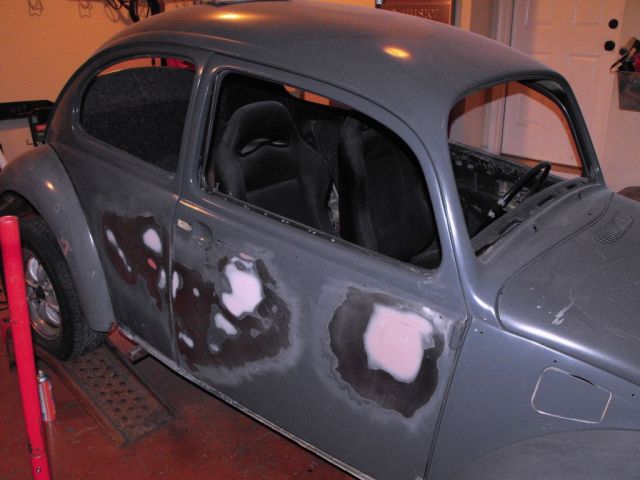
We have been working off and on for about a year. The 1970 bug started out a little shabby but it's coming along. It's our fist bug (been a Jeep guy for many, many years). Thought this would be a cool ride for my 16yr son. We have a budget of about $2,000 - $2,500 and it looks like we will hit our mark.
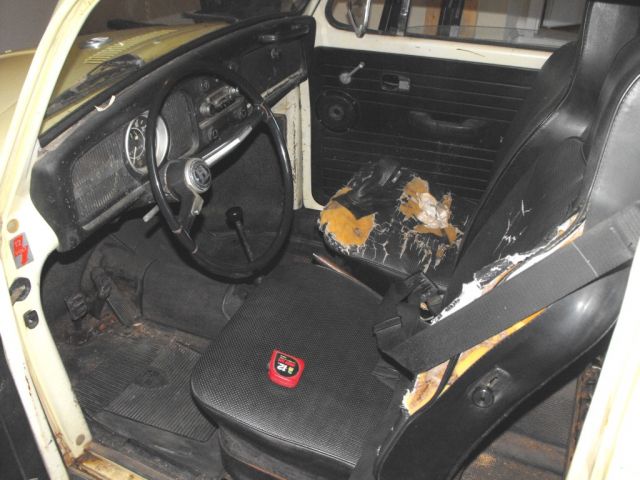
Just finished mounting the new seats. Had to weld in new mounts. Also welded new floors behind the seats... Hope to have most items done soon. Weather is getting warm so we will get back to body work and paint in the next couple of days. Doing the "Roll -ON" paint job to save him some bucks...
Last edited by Ruptured Duck on Wed May 12, 2010 8:04 am; edited 1 time in total |
|
| Back to top |
|
 |
Ruptured Duck
Joined: 28 Dec 2009
Posts: 59
Location: Gainseville Ga
|
| Posted: Mon Mar 15, 2010 9:42 am Post subject: |
|
|
Got a little work done this weekend. Fabbed up the front early bumper to the 68 newer bumper horns. Was able to put some 4" HID lights on as well... Will be converting the rear horns to fit the early rear bumper as well. Tried to push them as close to the body as I could.
Also did more body work and sanding... Another load of parts are on there way so hope to have more done soon... Looking to have it ready for some of the spring events.. 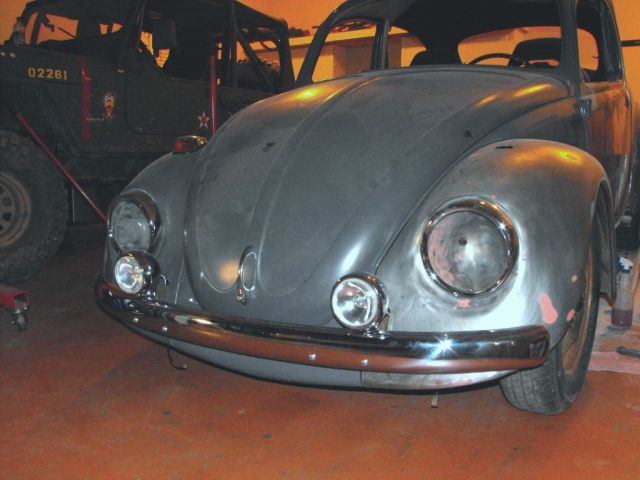
 |
|
| Back to top |
|
|
Tanbug
Joined: 02 Sep 2008
Posts: 22
Location: Temple, GA
|
| Posted: Tue Mar 16, 2010 12:11 pm Post subject: |
|
|
Pay attention to the door hinges if you are planning to paint all over. Multiple layers on the hinges can hide oil & rust that can flake off after painting.
_________________
Tanbugwerks |
|
| Back to top |
|
|
Ruptured Duck
Joined: 28 Dec 2009
Posts: 59
Location: Gainseville Ga
|
| Posted: Tue Mar 16, 2010 1:18 pm Post subject: |
|
|
| Tanbug wrote: | | Pay attention to the door hinges if you are planning to paint all over. Multiple layers on the hinges can hide oil & rust that can flake off after painting. |
Thanks... Sanded all that area pretty good... I'll take a second look tonight.
Did a 400 grit full sanding last night to even out all panels for the new coats of paint.
Really struggling with doing the lower section in off white.... I like the two tone look but it's been a hard sell to the kid and wife. |
|
| Back to top |
|
|
Ruptured Duck
Joined: 28 Dec 2009
Posts: 59
Location: Gainseville Ga
|
| Posted: Tue Mar 23, 2010 9:19 am Post subject: |
|
|
We just finished rolling on the 4th coat of paint and will be wet sanding with 600 grit. We will then add anther 2 coats and then 800 grit wet sand. If all goes as planned we will be doing 1200 wet sand and final polishing compound this weekend. Then we can start putting all the parts back on! 
I'll post pictures tomorrow of the current paint finish. So far I'm not unhappy with the $75 roll on paint job...  |
|
| Back to top |
|
|
Ruptured Duck
Joined: 28 Dec 2009
Posts: 59
Location: Gainseville Ga
|
| Posted: Wed Apr 21, 2010 9:29 am Post subject: |
|
|
Well.... Got the 2nd build motor running last night.... Sounds great and is soooooooo much better than the first go around. Will post pictures soon.
Trying to get it done before the end of the month. There is a blood drive - car (Jeep) show the first weekend of May in Kennesaw (Hooters) and I want it done before then. If there is interest I can post up information.. |
|
| Back to top |
|
|
Ruptured Duck
Joined: 28 Dec 2009
Posts: 59
Location: Gainseville Ga
|
| Posted: Fri Apr 23, 2010 9:28 am Post subject: |
|
|
Here are recent images... new front tires (195-50-15) that fit really nice under the narrowed and dropped front. Still need to adjust the rear down 2-3"... Might even drive it around the hood this weekend for the first time in 6 years.


 |
|
| Back to top |
|
|
Jon
Site Admin
Joined: 01 Jun 2006
Posts: 2421
Location: Bishop GA
1969 Volkswagen Type 3
|
| Posted: Fri Apr 23, 2010 10:18 am Post subject: |
|
|
Lookin good. I like that roll-on paint job. 
_________________
73 Typ481
76 Westy
73 Bug
69 Squareback
70 Fastback
63 Bug |
|
| Back to top |
|
|
Ruptured Duck
Joined: 28 Dec 2009
Posts: 59
Location: Gainseville Ga
|
| Posted: Fri Apr 23, 2010 10:46 am Post subject: |
|
|
| Jon wrote: | | Lookin good. I like that roll-on paint job. |
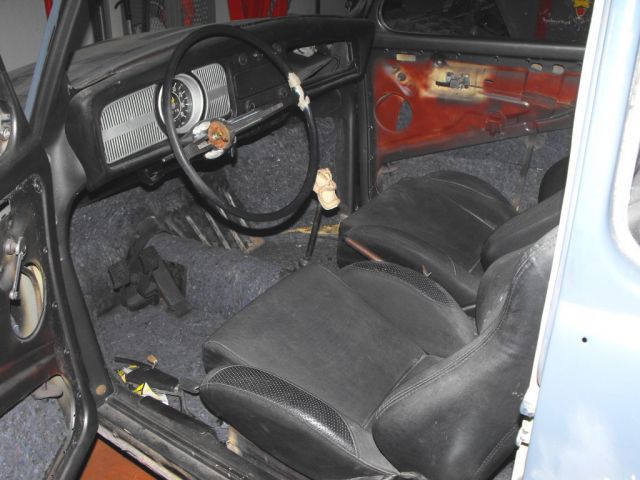
Thanks.. We have also taken a new direction with the seats... We will be installing aftermarket Samurai seats... Already light gray in color with matching dark grey piping... They have a low back look with separate headrest |
|
| Back to top |
|
|
Ruptured Duck
Joined: 28 Dec 2009
Posts: 59
Location: Gainseville Ga
|
| Posted: Mon Apr 26, 2010 8:02 am Post subject: |
|
|
Well.... Nothing like driving a car that has been dead for over 6 years....
First drive was this Sunday... Fewer things to adjust than I expected.. Some minor tweaks and we start to bolt everthing back on.
The best part was Sunday morning... Grayson, my 6 yr old daughter, setting in the floor board (under the steering wheel) helping me to bleed the brakes.
Pump...... Hold, ..... Pump..... Hold, never missed a beat and never complained. She loves this type of stuff. Life was good Sunday.
 |
|
| Back to top |
|
|
Ruptured Duck
Joined: 28 Dec 2009
Posts: 59
Location: Gainseville Ga
|
| Posted: Mon May 03, 2010 4:58 pm Post subject: |
|
|
Well.... Adjusted the rear down.. Its 1.5" higher than the front. From the point the running boards mount we are 7" in front and 8.5" in the rear. Being the first time I had ever worked with the rear torsion bars it took a little adjusting to get the height dialed in. Hard to keep the spline count in your head when the darn things drop out of your hand and you have no idea where you were at....
Will try to get some images tonight. Need to see what it looks like out of the garage.
We are also using fabric paint to color the white headliner black.... So far so good and it's a lot cheaper than replacing the old white liner. It was in so so good shape and this seemed to be the best way of keeping the budget down. |
|
| Back to top |
|
|
Ruptured Duck
Joined: 28 Dec 2009
Posts: 59
Location: Gainseville Ga
|
| Posted: Tue May 04, 2010 8:09 am Post subject: |
|
|
Here are the images... The last show the painted headliner.


 |
|
| Back to top |
|
|
Ruptured Duck
Joined: 28 Dec 2009
Posts: 59
Location: Gainseville Ga
|
| Posted: Mon May 10, 2010 7:58 am Post subject: |
|
|
Finished the final coat of paint this weekend...
Looks better than some of the cars I saw at a big car show this weekend.... (not bragging... more amazed!!!)
We start putting all the glass and weather stripping in this week. |
|
| Back to top |
|
|
71_georgia_beetle

Joined: 28 Mar 2008
Posts: 440
Location: Grayson, GA
1974 Volkswagen Westfalia
|
| Posted: Mon May 10, 2010 1:20 pm Post subject: |
|
|
Looks awesome!
_________________
71 Standard Beetle "Big Bird"
74 Westfalia "Winifrid"
Burel Photography
Call me if I need you! |
|
| Back to top |
|
|
Ruptured Duck
Joined: 28 Dec 2009
Posts: 59
Location: Gainseville Ga
|
| Posted: Wed May 12, 2010 8:10 am Post subject: |
|
|
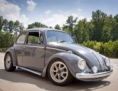
Well.... we started to put on the bright work.. Have a question I'll post in the tech side... Final coat of paint and wet sand done. Needed to see what the "Fat Chick" was going to look like so we dressed her a little last night... Took some pictures this morning before my daughter went to school.... She popped up in one of the pictures. Had no clue until I posted them..
What do you guys think... ? Feeling good about our first bug for under $2500...


 |
|
| Back to top |
|
|
|