| View previous topic :: View next topic |
| Author |
Message |
KleineVW
Joined: 18 Apr 2011
Posts: 103
|
 Posted: Fri Jan 13, 2012 1:56 pm Post subject: 1972 Beetle, Ongoing project Posted: Fri Jan 13, 2012 1:56 pm Post subject: 1972 Beetle, Ongoing project |
 |
|
While my 1972 beetle is out of commission due to a blown engine, I've decided to take on a few more improvements. Probably will need some help and advise throughout the project as usual.

The plan:
1) Use existing parts with new heads and pistons to rebuild a 1600 Dual port to get the car on the road faster. With one engine build under my belt I hope to build a second more high performance engine with dual carbs, high end exhaust, etc. I'm leaning towards a 1776 but if anyone finds a Type 4 engine lying around I'd be glad to take it off their hands 
2) With the engine out of the car I want to clean up the engine compartment. I've never done any body work, so it should be an adventure. I plan on cutting off the clips and filling any unused holes. I feel pretty confident in painting it myself, but I'll definitely need to hire someone to weld/fill in the holes. Any suggestions? Does everyone agree the color is Texas Yellow? Any recommended sources for the paint locally?


3) Remove the ratty/torn Headliner and replace it with a custom (home made) alternative.


4) The previous owner removed the dash pad and left the job 1/2 done. I'd like to fill in the mount holes and side vent holes and repaint the dash. I need a functioning speedometer and will probably get better looking knobs over time.

I've probably bitten off more than I can chew and I'm terribly slow at getting stuff done, but I'll keep everyone updated. Hope to have it ready for Bugapalooza or Poker Run. |
|
| Back to top |
|
 |
Clyde

Joined: 03 Jun 2006
Posts: 855
Location: Athens
|
| Posted: Fri Jan 13, 2012 6:16 pm Post subject: |
|
|
Most auto paint supply houses will have a laser gun they can shoot your car with, and tell you exactly what your color is, and custom mix it to match.
_________________
'69 Bug, 1776, dual kadrons, Web 111 cam
Clyde's Aircooled
(706) 206 6327 |
|
| Back to top |
|
|
KleineVW
Joined: 18 Apr 2011
Posts: 103
|
| Posted: Wed Jan 18, 2012 3:51 pm Post subject: |
|
|
I've finally made some progress this week. Dropped off the engine case for machine work. Ripped out the headliner and decided that no matter what I did i wouldn't be happy with the results of a homemade version, especially if I left white vinyl pillars with an all black interior so out came the rest of the interior. My plan at this time is to paint the interior while I'm painting the dash and use a minimalist headliner like this picture.

Sewfine gave me a good idea on covering up the tab strips with windlace and thus avoid cutting them out.
I cannot decide what to do with the dash. I'm considering filling in the fresh air system side vents and knobs. The car only has the main fresh air box with no connection to the vents so I'm not even sure what its suppose to function like. For those with older model bugs, is the fresh air system (without the fan) actually effective and do you use it? I'll post pictures soon. |
|
| Back to top |
|
|
Greg
Joined: 12 Aug 2009
Posts: 490
Location: Jefferson, GA
1969 Volkswagen Beetle
|
| Posted: Thu Jan 19, 2012 4:31 pm Post subject: |
|
|
If all the bits and pieces are in place, the stock defrost system works pretty good provided you're at hightway speeds (55+) Otherwise, not so much. You also need the two levers between the seats functioning to channel the heat forward.
_________________
1969 Beetle
1974 Westy FI Conversion |
|
| Back to top |
|
|
KleineVW
Joined: 18 Apr 2011
Posts: 103
|
| Posted: Mon Jan 23, 2012 7:16 pm Post subject: |
|
|
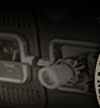
Any idea what this bracket on the left side of the engine bay was for. Guess i should know its original purpose before I cut it off.
 |
|
| Back to top |
|
|
modified 72 ghia
Joined: 04 Aug 2006
Posts: 366
Location: baldwin,ga
|
| Posted: Mon Jan 23, 2012 8:32 pm Post subject: mount |
|
|
dont know but I have seen them on all beattles
ron |
|
| Back to top |
|
|
serprice

Joined: 26 Nov 2007
Posts: 349
Location: Statham
1974 Volkswagen Beetle
|
| Posted: Mon Jan 23, 2012 9:00 pm Post subject: |
|
|
I think thats a radiator mount 
_________________
Shane Price
74 standard beetle |
|
| Back to top |
|
|
rustyfastback

Joined: 15 Jun 2006
Posts: 71
Location: Stone Mountain, GA
|
| Posted: Mon Jan 23, 2012 10:28 pm Post subject: |
|
|
That bracket is for the vacuum servo for the auto-stick trans.
_________________
Give me a salad & a PBR please |
|
| Back to top |
|
|
KleineVW
Joined: 18 Apr 2011
Posts: 103
|
| Posted: Sun Jan 29, 2012 9:27 pm Post subject: |
|
|
Made some decent progress this weekend. I convinced my dad to come down with a borrowed welder. We proceeded to accidently burn a hole in the dash as we were trying to figure it out, but it all worked out and by the end of the day were producing some good strong reasonably attractive welds. Decided to say good buy to the fresh air system, all associated vents and knobs were filled. Also filled the padded dash mounting holes and mounting holes around the glove box. Built a stabilizing plate to mount behind the center of dash and stereo head unit to add some strength to the thin sheet metal. Finally laid down the first coat of bondo to the filled in holes.

Turns out the bracket on the left side of the engine compartment is the mount for some kind of altitude compensator that attaches to the throttle/carb. No need for it and all the tar board tabs....removed. Welded in 10 screw holes in the firewall from PO's.


I was feeling pretty confident at this point so I cut off all the headliner mounting tabs and successfully increased the time I'll need to devote to body work. Pictures a little dark but you get the point.

I'm pretty proud of the work we got done. Welds might not be too pretty but their functional. My dad started talking about wanting to build a type 4 rail buggy, so I invited him to Jakes tech day, we'll see! |
|
| Back to top |
|
|
KleineVW
Joined: 18 Apr 2011
Posts: 103
|
| Posted: Sun Feb 26, 2012 10:52 pm Post subject: |
|
|
Finished the body work and primed everything this weekend. Being my first time it took forever to get it right, next time I'll let somebody else do it. I'm very pleased with the results, nice smooth and clean look. Next up, fine sanding of the primer and paint.
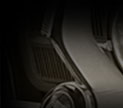
Clean engine compartment minus tabs and 10 holes from the PO's.

Smooth no pad dash, minus 4 air vents, 2 knobs, and 4 mounting holes.

No head liner tabs and clean pillars.

One side of a homemade replacement/support floor pan to to reinforce pans under the back seat. Planning on painting the pans with Master Series rust primer to prevent further decay.
 |
|
| Back to top |
|
|
Jon
Site Admin
Joined: 01 Jun 2006
Posts: 2421
Location: Bishop GA
1969 Volkswagen Type 3
|
| Posted: Sun Feb 26, 2012 11:03 pm Post subject: |
|
|
You do good work Kris. It is coming along well.
_________________
73 Typ481
76 Westy
73 Bug
69 Squareback
70 Fastback
63 Bug |
|
| Back to top |
|
|
KleineVW
Joined: 18 Apr 2011
Posts: 103
|
| Posted: Tue Jun 19, 2012 8:42 pm Post subject: |
|
|
Who says wet sanding and clean up has to be difficult, you just need a crew of 11 year olds who will work for ice cream. Needs a few more coats and touch up, then I can put the interior back together. More pictures to come soon!
 |
|
| Back to top |
|
|
KleineVW
Joined: 18 Apr 2011
Posts: 103
|
| Posted: Sun Jul 01, 2012 9:43 pm Post subject: |
|
|
Made significant progress this weekend. Got the lower end of the engine put together this weekend with ALOT of help from Clyde.


Clyde using dental floss on the engine to prevent oil leaks

On Sunday I got the interior prepped for the second and final round of painting on July 4th. I may have a running car again in the near future! |
|
| Back to top |
|
|
KleineVW
Joined: 18 Apr 2011
Posts: 103
|
| Posted: Wed Jul 04, 2012 8:04 pm Post subject: |
|
|
Finally finished the painting today. Came out nice and clean as I hoped.


 |
|
| Back to top |
|
|
KleineVW
Joined: 18 Apr 2011
Posts: 103
|
| Posted: Tue Jul 24, 2012 10:39 pm Post subject: |
|
|
I've made some good progress over the last couple days.
Put down Mastercraft silver rust converter primer on throughout the interior and triple coated the pans.

I let it cure for a week and in the meantime converted all the interior trim from stock off white to satin black. Also tried to dress up the VDO gauges by using faux chrome paint on the edges.


Then I covered the luggage compartment and pan with poor mans dynamat (Quik roof) for sound deadener.

Lastly I covered all it all with reflectix insulation (foil incapsulated bubble wrap. I only glued it on the vertical surfaces and left it loose on the pans so it can be removed to dry up water that may show up from leaks or the accidentally left down window.

Put back in the pop outs and started installing gauges this evening, more pictures to come! |
|
| Back to top |
|
|
|